CS4740 Cloud Computing
Neal Magee, Ph.D.
Solution Architect, Research Computing
University of Virginia, Fall 2022
Lab: AWS SDK using boto3 in Python
SDKs (Software Development Kits) represent code-based interfaces to an application framework. In the case of Amazon Web Services, every service is available primarily as public API. (Even the web console is merely interacting with these APIs.) Rather than configuring elaborate authenticated RESTful API calls, the AWS SDKs do the heavy lifting for the developer in posting payloads, handling response data, error handling, and tainting requests for required fields and acceptable data.
This lab introduces the basics of working with the boto3 library in Python3.
Python3
All students are expected to create code snippets compatible with Python3. Python2 has been dropped from support and is no longer a secure or sustainable language release.Setup
-
Setup requires two elements:
- Software:
boto3andawscli- to install, run
pip install boto3 awscli
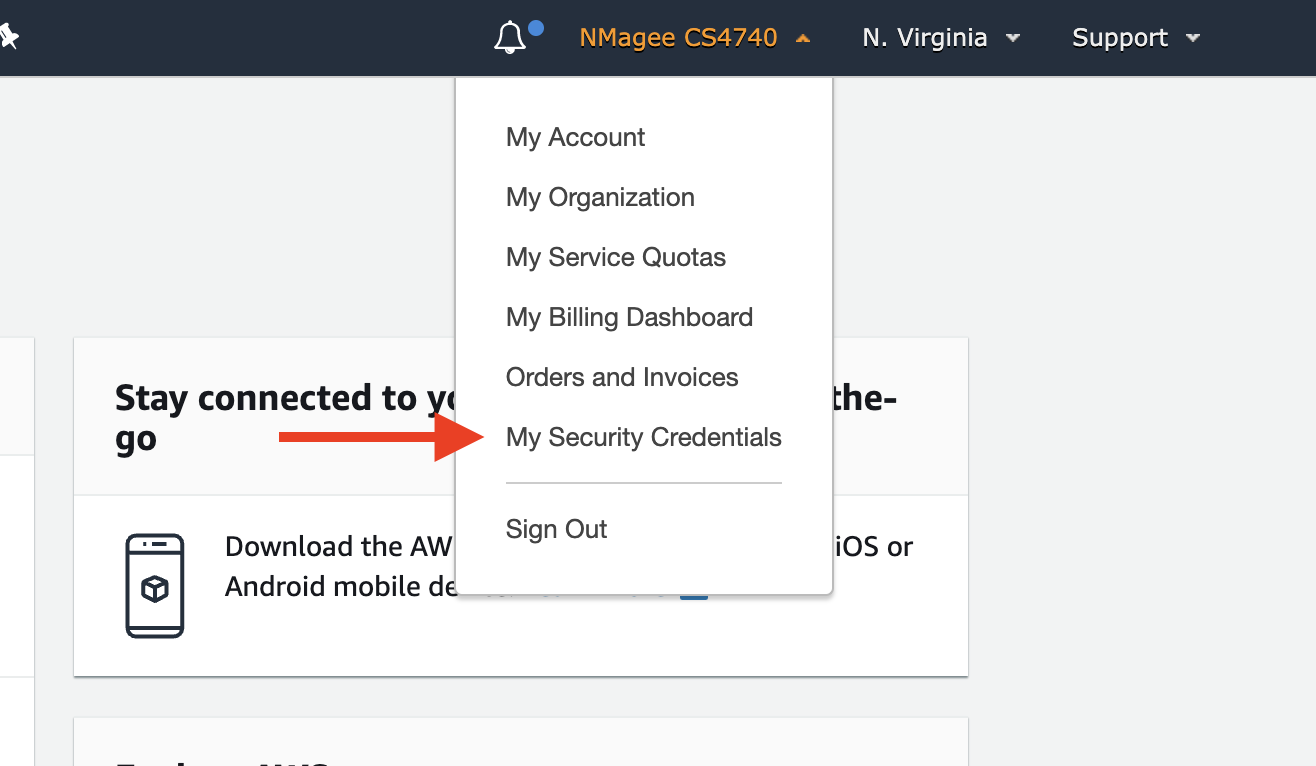
You can create a virtualenv for this, install it to the system, your user space, or work from within a Docker container. - AWS Access Keys: Sign into your AWS Account and go to your account on the menu bar (upper right). Select "My Security Credentials."
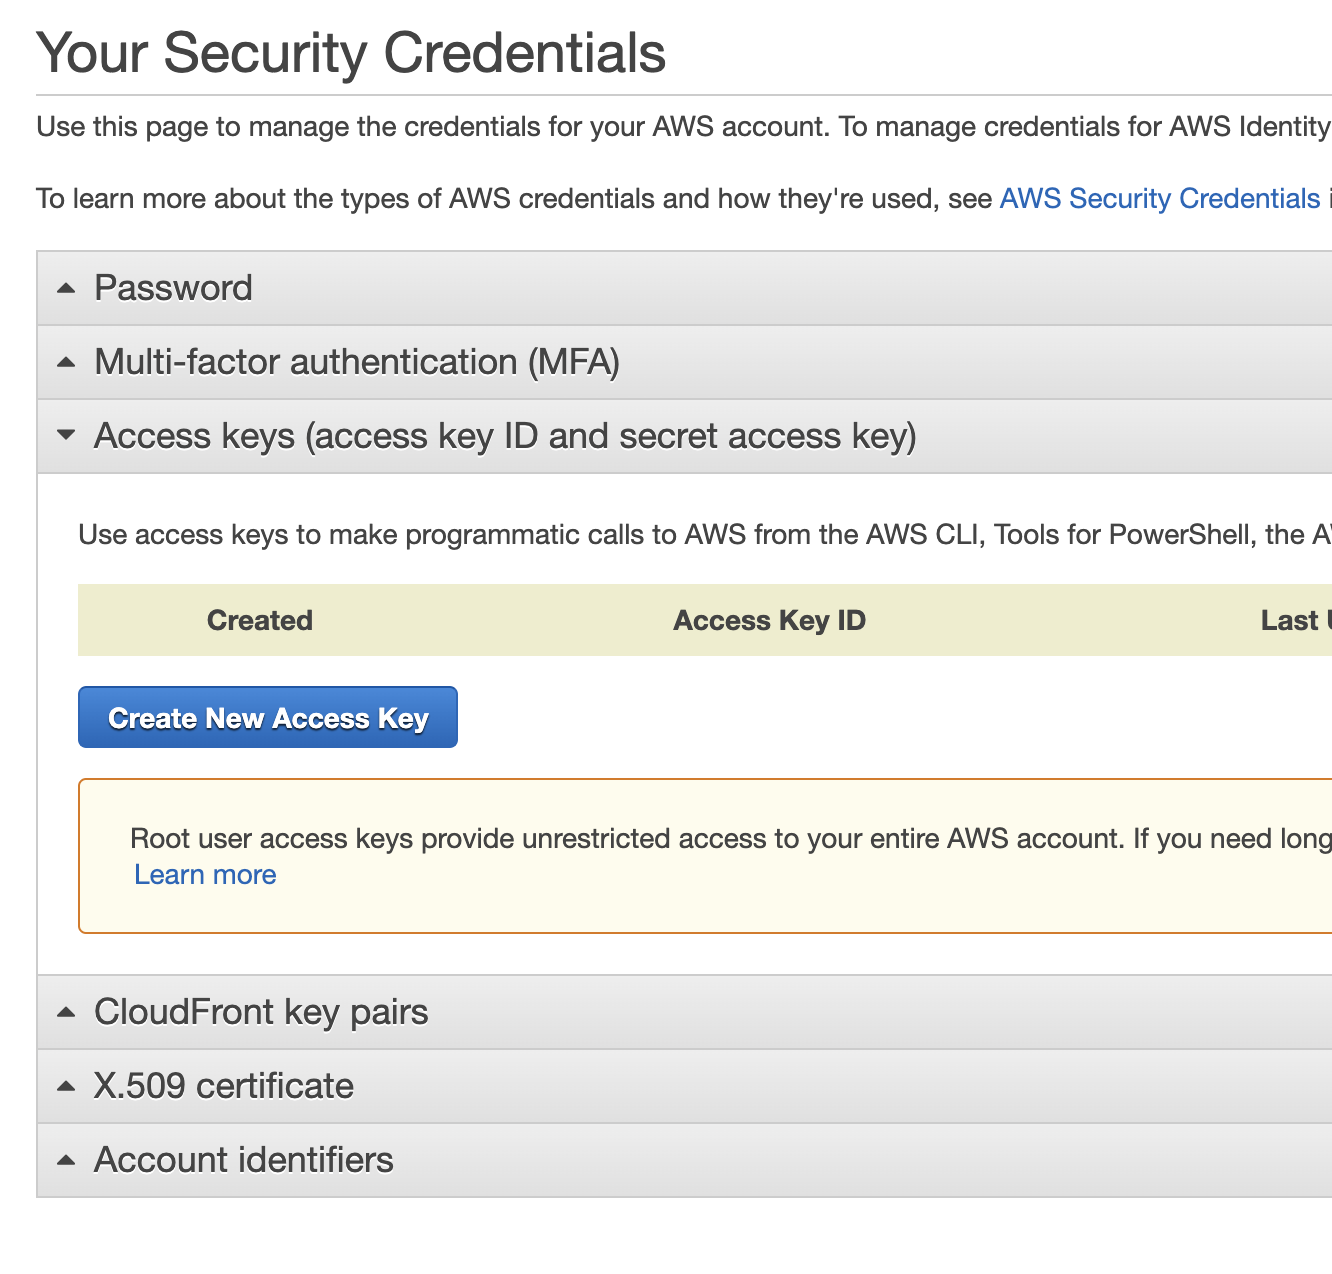
Open the section named "Access keys" and create a new access key if you have not before.
Once you create a new key the following screen will appear. This will be your ONLY opportunity to copy or download the secret access key. Store both keys in a secure location.
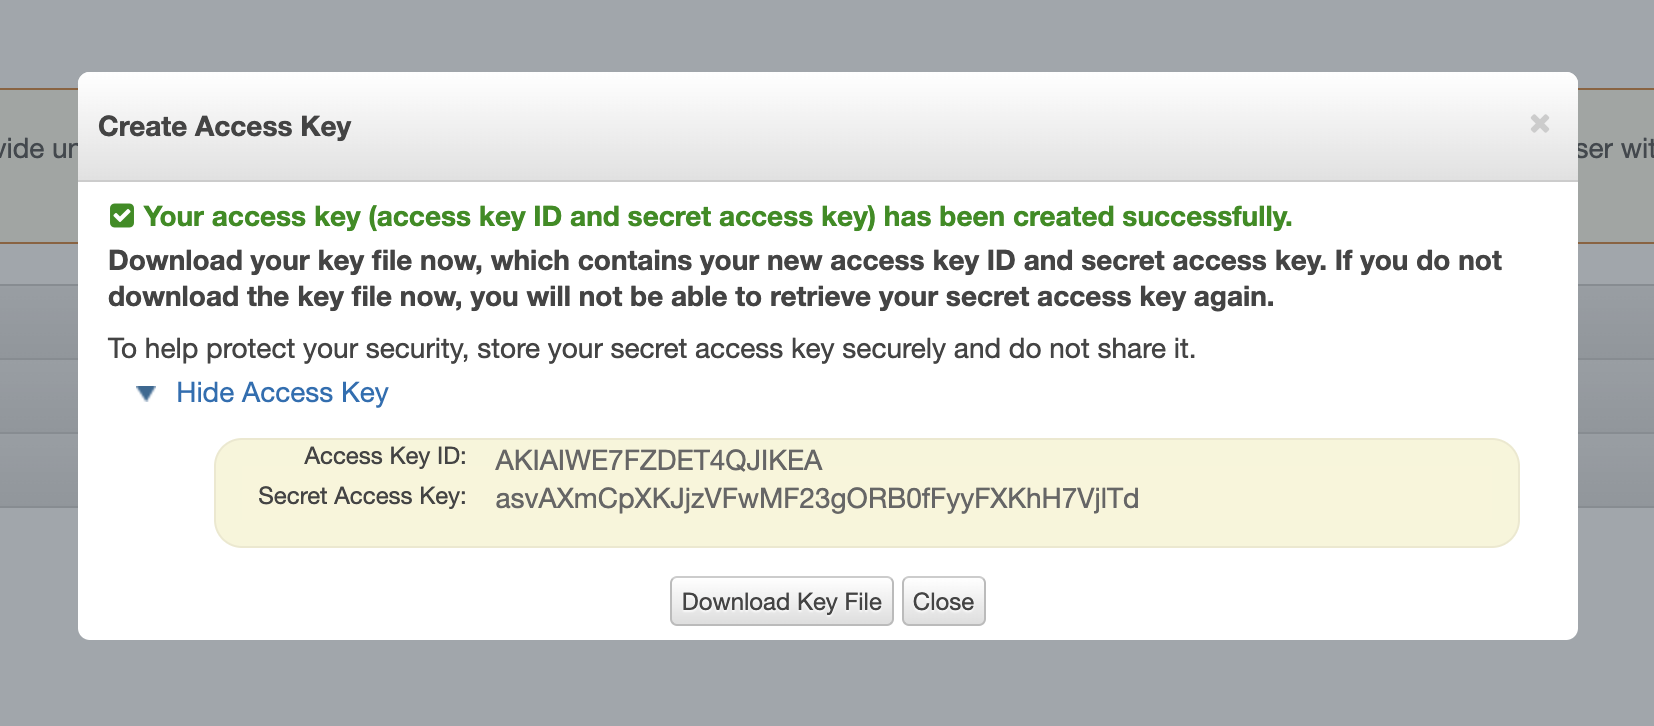
NOTE that the keys you just created are for your "root" account access, which means they have full owner privileges
- Software:
- Switch to your terminal or shell application. If the
awscommand-line has been installed correctly, you should be able to configure it with your keys:
aws configure
- You will be prompted for your access key, secret access key, default region, and default output:
- Access Key:
********************** - Secret Access Key:
********************************************** - Default region:
us-east-1 - Output: Select from text, table, or json.
- Access Key:
- Test your AWS access via the command-line:
aws s3 ls
Should display all your S3 buckets. If you have no buckets, try making one:
aws s3 mb s3://some-bucket-name
-
You are now set up and ready to code!
boto3will look for your AWS credentials, which are now stored in./aws/in your home directory.
Basics
boto3has options for creating client and resources. The boto3 reference for EC2 can be found here and declares a client like this:- This client, through the AWS configuration you performed above, is already aware of your security credentials and preferred region.
-
To launch an EC2 instance using
boto3, get or create the following:
- A Key Pair - get the name.
[some-key] - A Security Group - get the group ID.
[sg-a1b2c3d4e5f6g7h8] - A VPC subnet - get the subnet ID.
[subnet-a12b34c56] - An Amazon Machine Image (AMI) ID
[ami-02354e95b39ca8dec]
- A Key Pair - get the name.
-
Putting these elements together, the
run_instancescall will look something like this:import boto3 response = client.run_instances( ImageId='ami-02354e95b39ca8dec', InstanceType='t2.micro', KeyName='mageen-uvasom', SecurityGroupIds=[ 'sg-04262c688917e0891', ], SubnetId='subnet-b39b21c5', DryRun=False, MinCount=1, MaxCount=1, InstanceInitiatedShutdownBehavior='terminate', TagSpecifications=[ { 'ResourceType': 'instance', 'Tags': [ { 'Key': 'Name', 'Value': 'boto3-created-instance' }, ] }, ] ) print(response)This will create the following response payload describing the instance that has been created:
{'Groups': [], 'Instances': [{'AmiLaunchIndex': 0, 'ImageId': 'ami-02354e95b39ca8dec', 'InstanceId': 'i-018ba63c1fd6e2f13', 'InstanceType': 't2.micro', 'KeyName': 'mageen-uvasom', 'LaunchTime': datetime.datetime(2020, 8, 21, 18, 28, tzinfo=tzutc()), 'Monitoring': {'State': 'disabled'}, 'Placement': {'AvailabilityZone': 'us-east-1d', 'GroupName': '', 'Tenancy': 'default'}, 'PrivateDnsName': 'ip-172-31-10-53.ec2.internal', 'PrivateIpAddress': '172.31.10.53', 'ProductCodes': [], 'PublicDnsName': '', 'State': {'Code': 0, 'Name': 'pending'}, 'StateTransitionReason': '', 'SubnetId': 'subnet-b39b21c5', 'VpcId': 'vpc-ba95c4de', 'Architecture': 'x86_64', 'BlockDeviceMappings': [], 'ClientToken': '', 'EbsOptimized': False, 'Hypervisor': 'xen', 'NetworkInterfaces': [{'Attachment': {'AttachTime': datetime.datetime(2020, 8, 21, 18, 28, tzinfo=tzutc()), 'AttachmentId': 'eni-attach-099a6b31b78c1bfb4', 'DeleteOnTermination': True, 'DeviceIndex': 0, 'Status': 'attaching'}, 'Description': '', 'Groups': [{'GroupName': 'crconnect-web', 'GroupId': 'sg-04262c688917e0891'}], 'Ipv6Addresses': [], 'MacAddress': '0a:81:bd:28:10:0f', 'NetworkInterfaceId': 'eni-00163e500f790ad94', 'OwnerId': '474683445819', 'PrivateDnsName': 'ip-172-31-10-53.ec2.internal', 'PrivateIpAddress': '172.31.10.53', 'PrivateIpAddresses': [{'Primary': True, 'PrivateDnsName': 'ip-172-31-10-53.ec2.internal', 'PrivateIpAddress': '172.31.10.53'}], 'SourceDestCheck': True, 'Status': 'in-use', 'SubnetId': 'subnet-b39b21c5', 'VpcId': 'vpc-ba95c4de', 'InterfaceType': 'interface'}], 'RootDeviceName': '/dev/xvda', 'RootDeviceType': 'ebs', 'SecurityGroups': [{'GroupName': 'crconnect-web', 'GroupId': 'sg-04262c688917e0891'}], 'SourceDestCheck': True, 'StateReason': {'Code': 'pending', 'Message': 'pending'}, 'Tags': [{'Key': 'Name', 'Value': 'boto3-created-instance'}], 'VirtualizationType': 'hvm', 'CpuOptions': {'CoreCount': 1, 'ThreadsPerCore': 1}, 'CapacityReservationSpecification': {'CapacityReservationPreference': 'open'}, 'MetadataOptions': {'State': 'pending', 'HttpTokens': 'optional', 'HttpPutResponseHopLimit': 1, 'HttpEndpoint': 'enabled'}}], 'OwnerId': '474683445819', 'ReservationId': 'r-0f3fe6b1c3bf904da', 'ResponseMetadata': {'RequestId': '5d1fc86e-709a-47d0-8236-531d3a932024', 'HTTPStatusCode': 200, 'HTTPHeaders': {'x-amzn-requestid': '5d1fc86e-709a-47d0-8236-531d3a932024', 'content-type': 'text/xml;charset=UTF-8', 'content-length': '4916', 'vary': 'accept-encoding', 'date': 'Fri, 21 Aug 2020 18:28:00 GMT', 'server': 'AmazonEC2'}, 'RetryAttempts': 0}} - Please note the following:
- Nearly every
boto3resource has aDryRunflag. Set this toTrueto test your request. The response data will inform you whether your request was structured well and would have succeeded. - Note some dictionaries in your submitted payload that allows for more than one value. These include security groups, tags, EBS volumes, and roles.
- Every API request through the SDK is linted. You should receive intelligent error responses about missing or malformed fields when issuing a request by hand.
- The above snippet does not handle errors intelligently. Use
tryandexceptlike this:
import botocore import boto3 client = boto3.client('aws_service_name') try: client.some_api_call(SomeParam='some_param') except botocore.exceptions.ClientError as error: # Put your error handling logic here raise error except botocore.exceptions.ParamValidationError as error: raise ValueError('The parameters you provided are incorrect: {}'.format(error)) - Nearly every
import boto3

client = boto3.client('ec2')
Try It Out
Select two scenarios below and complete them:
EC2 Compute
Update the necessary values in the run_instances() snippet below and run it yourself. Verify that a new instance has been created in your account.
import boto3

response = client.run_instances(
  ImageId='ami-02354e95b39ca8dec',
  InstanceType='t2.micro',
  KeyName='<YOUR_KEY_NAME>',
  SecurityGroupIds=[
    '<YOUR_SECURITY_GROUP>',
  ],
  SubnetId='<YOUR_SUBNET>',
  DryRun=False,
  MinCount=1,
  MaxCount=1,
  InstanceInitiatedShutdownBehavior='terminate',
  TagSpecifications=[
    {
      'ResourceType': 'instance',
      'Tags': [
        {
          'Key': 'Name',
          'Value': 'boto3-created-instance'
        },
      ]
    },
  ]
)

print(response)
Next, terminate the instance using another Python snippet.
S3 Storage
Create a python3 snippet that creates three buckets in S3. The boto3 documentation for S3 can be found here.
Create a python3 snippet that lists your buckets and prints them to the terminal.
For an additional challenge (optional), upload and download an object to your bucket using only Python.
SNS Notifications
SNS (simple notification service) allows you to programmatically send notifications between apps or to human recipients. In this scenario, send yourself an email or SMS message. To get started, go to the SNS service in your account using the AWS console:
- Create an SNS Topic. From the dashboard of the SNS service, enter a simple name in the "Create Topic" box and click "Next Step".
- On the next screen, enter a Display Name if you like. Leave other settings as-is. Click "Create Topic".
- While on the Topic details page, copy the ARN of the SNS topic you just created. You will need this in your
boto3request. - Add your email as a subscription to the topic. On the details page for your new topic, find the orange "Create Subscription" button and click it.
- In the "Create Subscription" form, select EMAIL and enter your email address as the Endpoint. Then click "Create Subscription". You will receive an email asking you to confirm your subscription. Or create an SMS endpoint and subscribe your mobile phone number.
Using the SNS publish resource, publish a message to your Topic in code. Specify at least a subject and a message.
Submitting this Lab
Paste one of the three working solutions into the space where provided in Collab.
Cleanup
Remove or delete any resources you created above after the lab is complete. Be especially sure not to leave an EC2 instance running!